Git Started: Basic Usage

This tutorial aims to explain Git in a way beginners can understand.
This is the second post of the cleverly named series Git Started.
In this post, we explore how to use git on the command line. To get
a conceptual understanding of Git, please refer to the first post:
[Git Started: Introduction]({% post_url 2019-09-21-git-started-introduction %}).
Let’s begin by exploring the general project workflow, so we can understand what we need to use Git for.
General Workflow
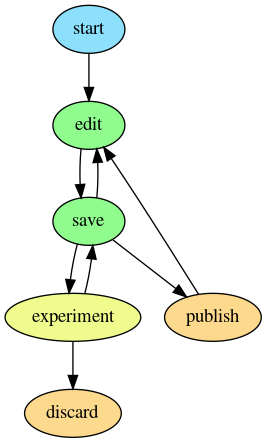
To understand why we use Git, let’s think about the workflow of a project. Generally there’s a start to a project but no end, and there are many iterations of edits and saves. There may be a time where we want to make experimental changes and then add or discard those changes to the main project as well.
The common flow that arises in a project is shown below.

Some things we only do once: start a Git repository. Some things we do a lot: editing and saving. Some things we only do sometimes: experimenting and publishing.
Of course there are many other actions, but let’s start with this small set to keep it simple.
Let’s Git to the Usage
Now that we have an idea of what a workflow looks like, let’s outline how to actually do those things.
Start
This part is easy.
mkdir new-super-awesome-git-project
cd new-super-awesome-git-project
git init
We just created a new Git repository to save all our files in!
Edit and Save
Editing isn’t necessarily a Git action, so I am including it in the Save section. These are the two most common things you will do on a project: make changes and save those changes.
Let’s begin by making a change.
echo '# new-super-awesome-git-project' > README.md
Great, we have a new file to save in our Git repository. Saving in Git is a two step process. First, you stage your changes, then you commit the staged changes. This allows you to fine tune what you add to your repository.
git add README.md                 # stage
git commit -m "Initial commit"    # commit
Each commit requires a message to be saved with it. Think of it as writing a note to whomever wants to understand what changes were made in that commit. Sure, they can just look at the files, but it’s a lot easier and nicer if someone (you) just summarizes it for them.
To review your beautiful saves, you look at the log.
git log

commit 9a88b31877c556ecca235be28d7188113ca4d44e (HEAD -> master)
Author: Miccah Castorina <contact@miccah.io>
Date:   Wed Nov 28 20:17:46 2018 -0600

    Initial commit
This will show you all of the commits and their summaries. To load
a previous save, you simply use the following command (where
COMMIT_HASH is the long string of hex characters after “commit”).
git checkout COMMIT_HASH
Think of it as saying “Let’s check out what the project looks like at this point.”
Experiment and Publish
To work on a feature, we will create a separate branch for all of our new saves and experiments. When we complete the feature, we can merge it back into the original branch (the default is master). Remember from our previous post, a branch is like a whole universe where we can make any changes without affecting the other universes. This means we can keep our branch without merging it; we don’t have to actually discard any changes.
Let’s create a branch and switch to it. Good thing I already showed you how to load saves, because switching branches is done exactly the same way.
git branch universe-42      # spawn universe
git checkout universe-42    # switch to that universe
Good job! Now let’s make some commits in our new universe to get ready to merge it back into our master branch.
echo '## universe-42 is the best universe' >> README.md
git add README.md
git commit -m "State the obvious"

echo 'Hello' > world
git add world
git commit -m "Greet the world"
Let’s merge! The first thing to do is to switch back to the master branch, because merging is a one-way operation. You merge another branch (universe) into your current branch (universe).
git checkout master
git merge universe-42
git log

commit 91002a422db453e0b5b181045f8a4b8676b960b9
Author: Miccah Castorina <contact@miccah.io>
Date: Wed Nov 28 20:46:05 2018 -0600

Greet the world

commit 91bf95d338e15c0746804ea683512c20c1c736d1
Author: Miccah Castorina <contact@miccah.io>
Date: Wed Nov 28 20:45:56 2018 -0600

State the obvious

commit 9a88b31877c556ecca235be28d7188113ca4d44e
Author: Miccah Castorina <contact@miccah.io>
Date: Wed Nov 28 20:17:46 2018 -0600

Initial commit
That was easy. Now we publish our changes for the world to see! In this example, we haven’t set up a remote, so we are just going to pretend. Normally, you will setup your project to sync with GitHub (which has awesome documentation on how to get started) or any other Git server.
git push
Yay!
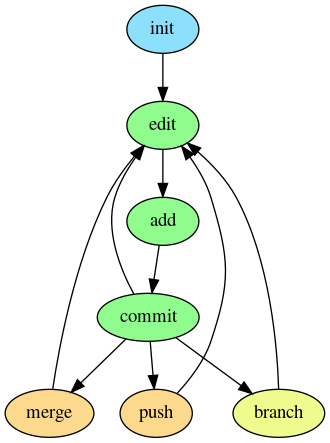
Git Workflow
Now that we understand the high level workflow and how Git works, let’s revise it to better capture the Git workflow.

Conclusion
In this post we learned the basic usage for working with the Git CLI. You should have gained enough knowledge to use Git competently, and the next section will go into even more usage detail. For those wanting to refine your Git-Fu and learn some Pro Tips!!!, see you there!